> ## Documentation Index
> Fetch the complete documentation index at: https://manuals.cobo.com/llms.txt
> Use this file to discover all available pages before exploring further.
# MPC Wallets production usage guide
This guide provides a step-by-step walkthrough for setting up and using MPC Wallets on Cobo Portal. You'll learn how to:
1. Set up your account and organization
2. Create vaults and wallets
3. Make deposits and withdrawals
Cobo Portal offers two types of MPC Wallets: [Organization-Controlled Wallets](/en/portal/mpc-wallets/ocw/introduction) and [User-Controlled Wallets](/en/portal/mpc-wallets/ucw/introduction). This guide will focus on Organization-Controlled Wallets.
 ## Prerequisites
* [Contact our sales team](https://www.cobo.com/book-demo/?utm_source=product-manual\&utm_medium=product\&utm_campaign=pricing-plan-intro\&utm_content=enterprise-contact-sales) to acquire your account activation link.
* A mobile device (iOS or Android) to run [Portal Mobile](/en/portal-mobile/introduction), our dedicated app for multi-factor authentication (MFA), operation approval, transaction signing, and key share management.
## Set up accounts and organization
As the first admin of your organization, complete these initial steps to configure your account and organization:
### Create an account
Use the activation link from our sales team to create your Cobo Portal account.
### Set up Portal Mobile
1. Log in to Cobo Portal.
* Registering for a free trial gives you immediate access to the Production environment — no need to switch to a development environment. You can run your trial and self-service upgrades all in production environment.
* For testing, Enterprise clients are encouraged to use the [development environment](https://portal.dev.cobo.com/login).
* For production, use the [production environment](https://portal.cobo.com/login).
2. Click your profile avatar in the top-right corner, select **Account**, and switch to the **Security** tab.
3. In the **Multi-Factor Authentication (MFA)** section, find the **Cobo Portal Mobile** row and click **Set Up** on the right.
4. Follow the on-screen instructions to install Portal Mobile on your mobile device and link your account with Portal Mobile. For detailed steps, see [Set up Portal Mobile](/en/portal-mobile/set-up).
### Configure governance policies and user roles
If you're in the testing phase and want to quickly verify deposits and withdrawals first, you can skip this section for now and configure them later.
Configuring governance policies and user roles is essential for managing access control and security in your organization.
* [Governance policies](/en/portal/organization/governance-intro) define approval rules for key operations (such as member deletion, organization freezing, and API key management), using mechanisms such as auto-approval, auto-rejection, and approval quorum. You can [edit governance policies](/en/portal/organization/governance-edit) if the default ones don't align with your organizational needs.
* [User roles](/en/portal/organization/roles-and-permissions) enable you to assign specific permissions to designated members within your organization. When you [assign a role to a member](/en/portal/organization/assign-roles-to-members), they can only perform actions allowed by that role. For instance, a member with the Viewer role can see wallet information but cannot withdraw tokens.
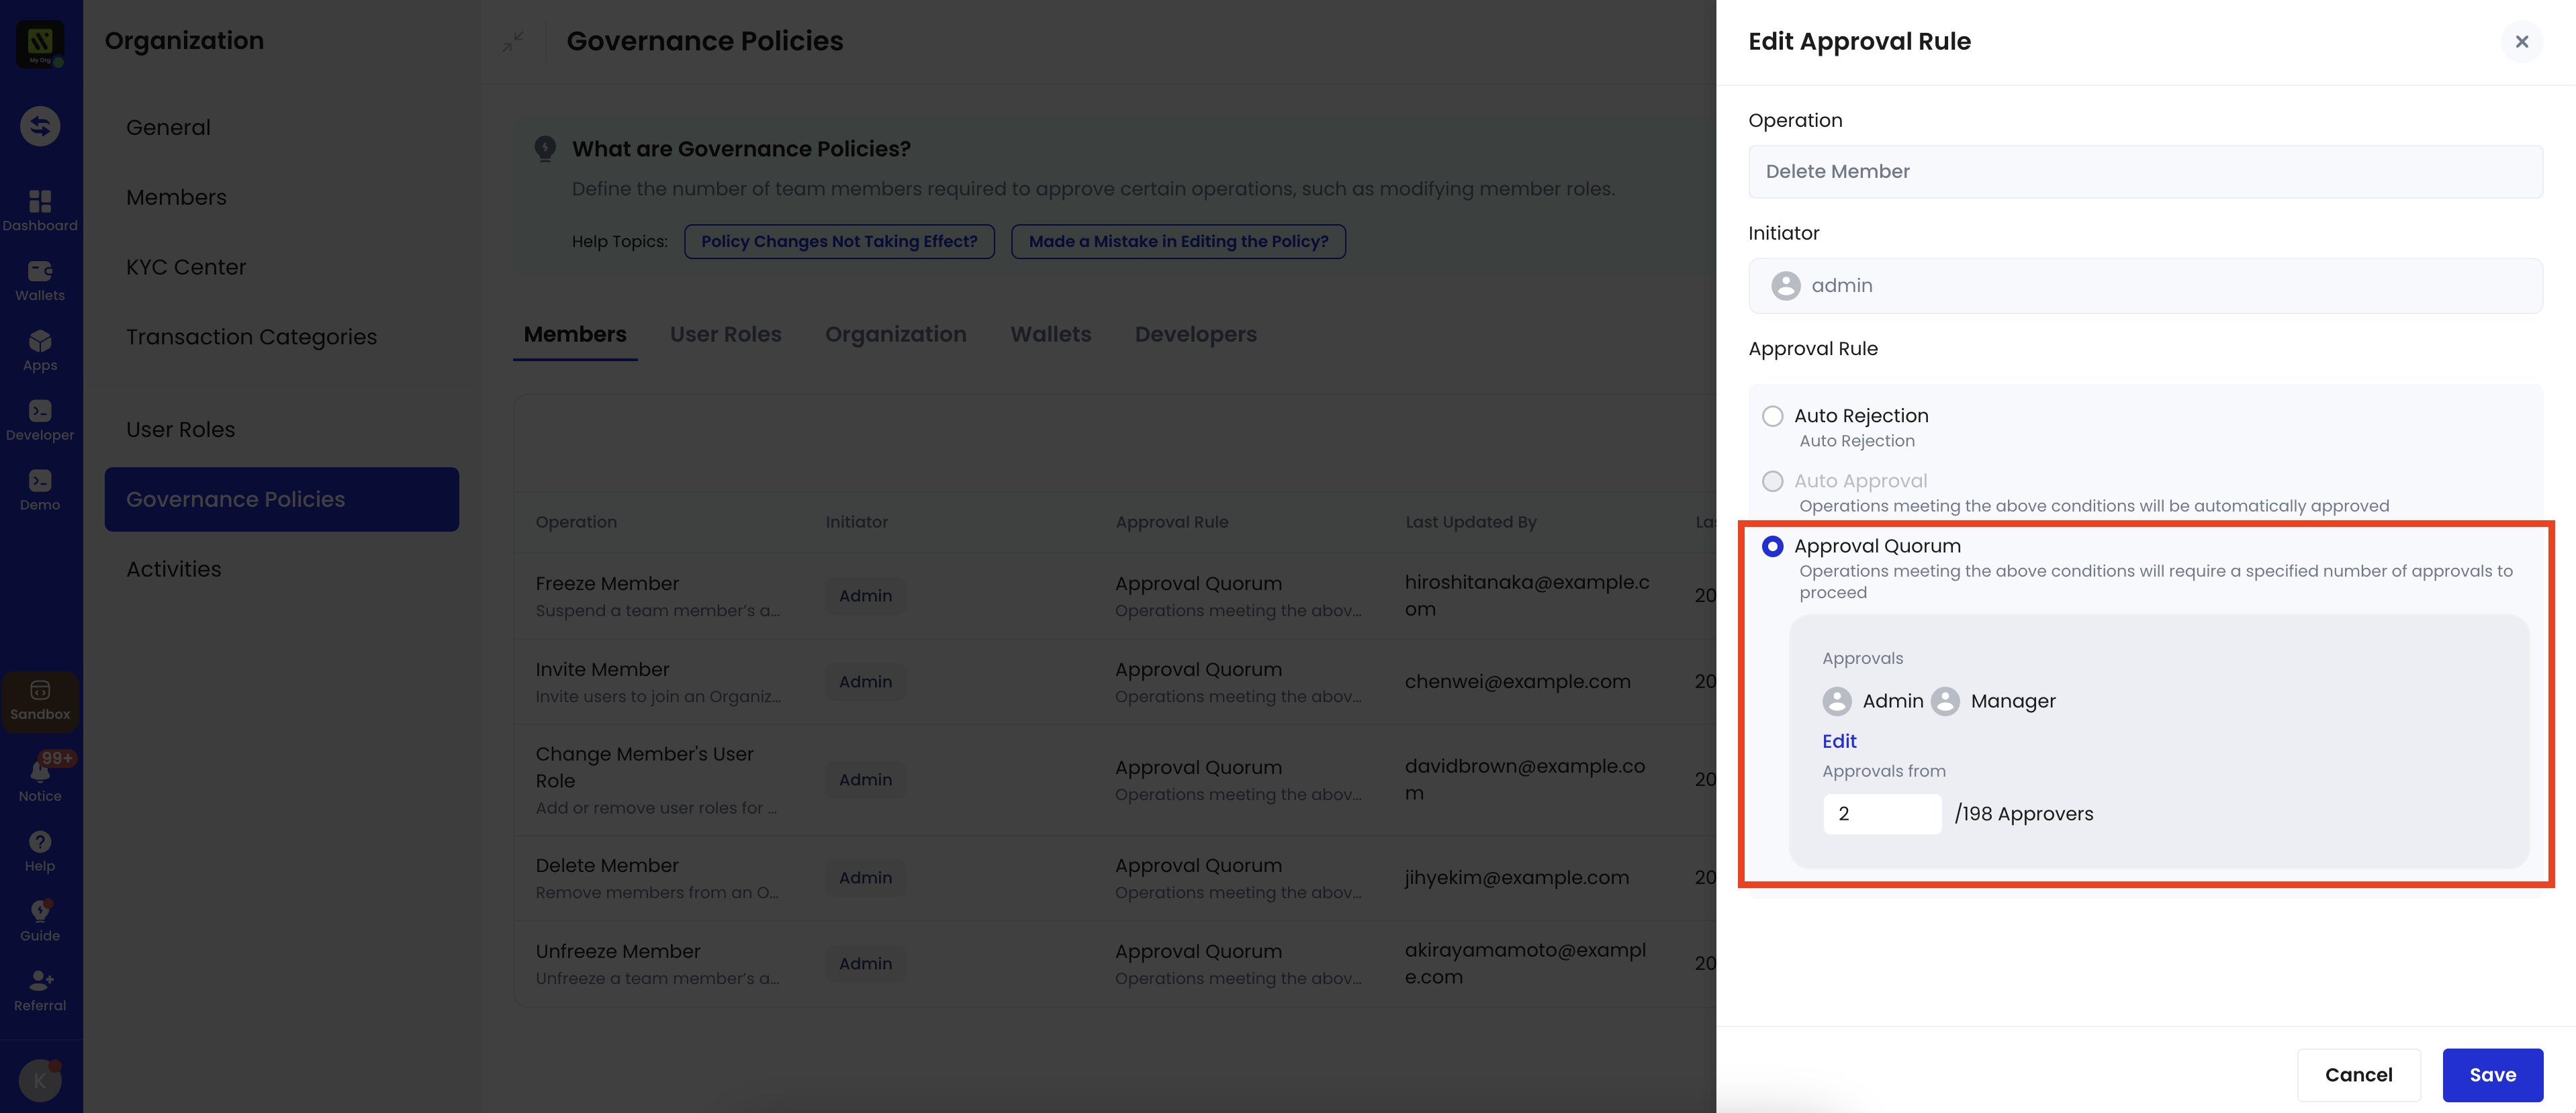
As an example, you could set up a governance policy requiring approval from at least two members with either Admin or Manager roles before deleting a member, as illustrated in the screenshot below.
## Prerequisites
* [Contact our sales team](https://www.cobo.com/book-demo/?utm_source=product-manual\&utm_medium=product\&utm_campaign=pricing-plan-intro\&utm_content=enterprise-contact-sales) to acquire your account activation link.
* A mobile device (iOS or Android) to run [Portal Mobile](/en/portal-mobile/introduction), our dedicated app for multi-factor authentication (MFA), operation approval, transaction signing, and key share management.
## Set up accounts and organization
As the first admin of your organization, complete these initial steps to configure your account and organization:
### Create an account
Use the activation link from our sales team to create your Cobo Portal account.
### Set up Portal Mobile
1. Log in to Cobo Portal.
* Registering for a free trial gives you immediate access to the Production environment — no need to switch to a development environment. You can run your trial and self-service upgrades all in production environment.
* For testing, Enterprise clients are encouraged to use the [development environment](https://portal.dev.cobo.com/login).
* For production, use the [production environment](https://portal.cobo.com/login).
2. Click your profile avatar in the top-right corner, select **Account**, and switch to the **Security** tab.
3. In the **Multi-Factor Authentication (MFA)** section, find the **Cobo Portal Mobile** row and click **Set Up** on the right.
4. Follow the on-screen instructions to install Portal Mobile on your mobile device and link your account with Portal Mobile. For detailed steps, see [Set up Portal Mobile](/en/portal-mobile/set-up).
### Configure governance policies and user roles
If you're in the testing phase and want to quickly verify deposits and withdrawals first, you can skip this section for now and configure them later.
Configuring governance policies and user roles is essential for managing access control and security in your organization.
* [Governance policies](/en/portal/organization/governance-intro) define approval rules for key operations (such as member deletion, organization freezing, and API key management), using mechanisms such as auto-approval, auto-rejection, and approval quorum. You can [edit governance policies](/en/portal/organization/governance-edit) if the default ones don't align with your organizational needs.
* [User roles](/en/portal/organization/roles-and-permissions) enable you to assign specific permissions to designated members within your organization. When you [assign a role to a member](/en/portal/organization/assign-roles-to-members), they can only perform actions allowed by that role. For instance, a member with the Viewer role can see wallet information but cannot withdraw tokens.
As an example, you could set up a governance policy requiring approval from at least two members with either Admin or Manager roles before deleting a member, as illustrated in the screenshot below.
 ### Invite members
1. Log in to Cobo Portal.
* Registering for a free trial gives you immediate access to the Production environment — no need to switch to a development environment. You can run your trial and self-service upgrades all in production environment.
* For testing,, Enterprise clients are encouraged to use the [development environment](https://portal.dev.cobo.com/login).
* For production, use the [production environment](https://portal.cobo.com/login).
2. Click your profile avatar in the top-right corner, and then click **Organization**.
3. Click **Members**. On the **Members** page, click **Invite Members**.
4. Enter the member's email address and name, and then select appropriate [user roles](/en/portal/organization/roles-and-permissions).
Confirm on Portal Mobile that this invitation was initiated by you. Also, as a default governance policy, at least half of your organization admins must approve the invitation request on Portal Mobile.
Upon receiving the invitation, new members should create their own accounts and set up Portal Mobile as described in the previous sections.
### Add chains
View and manage the chains available for your organization:
1. Log in to Cobo Portal.
* Registering for a free trial gives you immediate access to the Production environment — no need to switch to a development environment. You can run your trial and self-service upgrades all in production environment.
* For testing, Enterprise clients are encouraged to use the [development environment](https://portal.dev.cobo.com/login).
* For production, use the [production environment](https://portal.cobo.com/login).
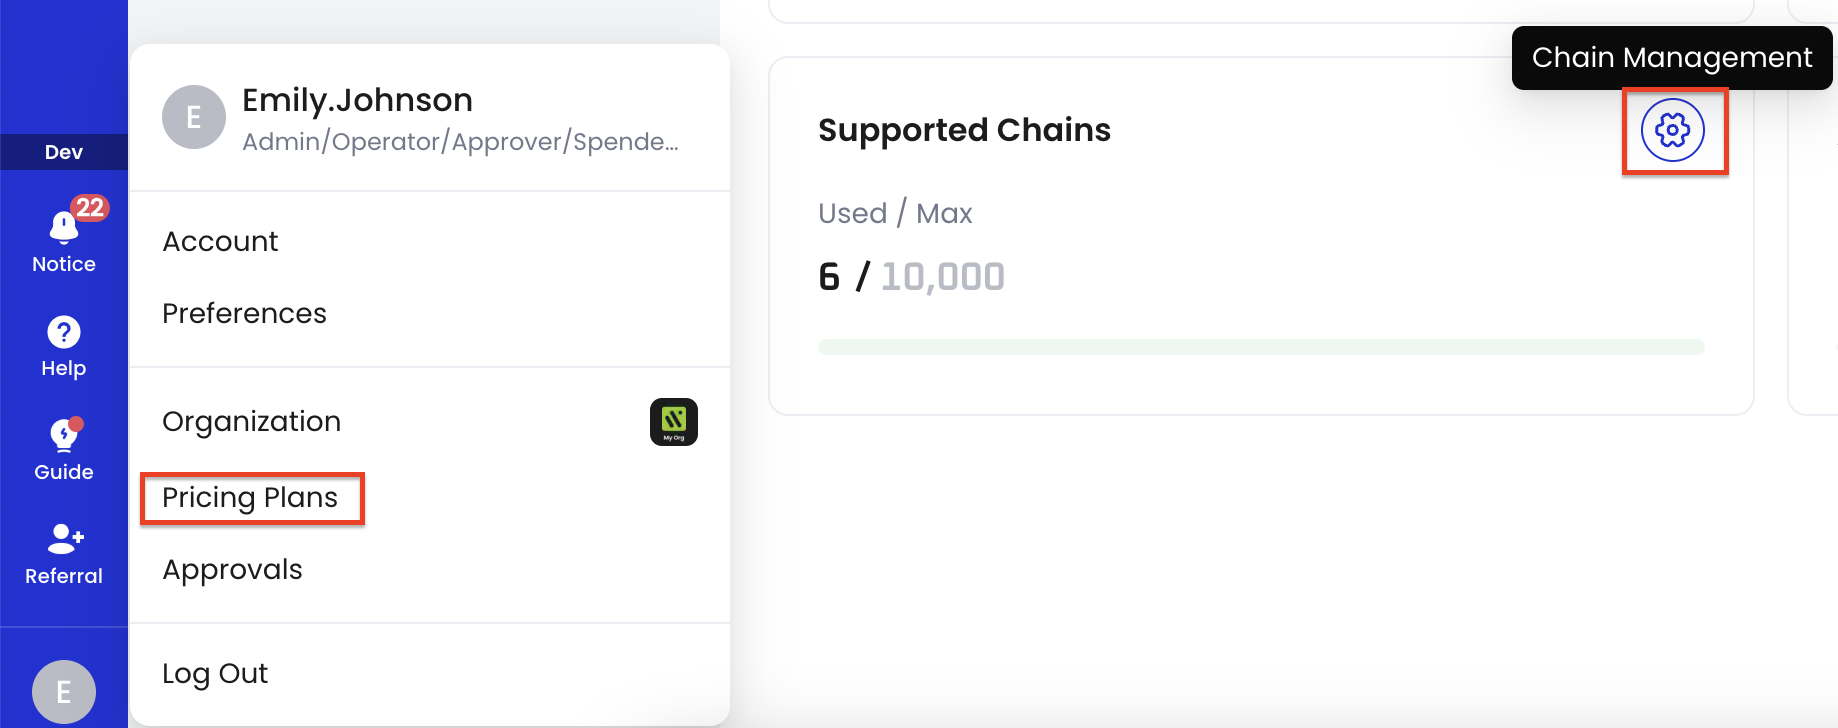
2. Click your profile avatar in the top-right corner, and then click **Pricing Plans**.
3. Navigate to **Supported Chains** and click the **Chain Management** icon.
### Invite members
1. Log in to Cobo Portal.
* Registering for a free trial gives you immediate access to the Production environment — no need to switch to a development environment. You can run your trial and self-service upgrades all in production environment.
* For testing,, Enterprise clients are encouraged to use the [development environment](https://portal.dev.cobo.com/login).
* For production, use the [production environment](https://portal.cobo.com/login).
2. Click your profile avatar in the top-right corner, and then click **Organization**.
3. Click **Members**. On the **Members** page, click **Invite Members**.
4. Enter the member's email address and name, and then select appropriate [user roles](/en/portal/organization/roles-and-permissions).
Confirm on Portal Mobile that this invitation was initiated by you. Also, as a default governance policy, at least half of your organization admins must approve the invitation request on Portal Mobile.
Upon receiving the invitation, new members should create their own accounts and set up Portal Mobile as described in the previous sections.
### Add chains
View and manage the chains available for your organization:
1. Log in to Cobo Portal.
* Registering for a free trial gives you immediate access to the Production environment — no need to switch to a development environment. You can run your trial and self-service upgrades all in production environment.
* For testing, Enterprise clients are encouraged to use the [development environment](https://portal.dev.cobo.com/login).
* For production, use the [production environment](https://portal.cobo.com/login).
2. Click your profile avatar in the top-right corner, and then click **Pricing Plans**.
3. Navigate to **Supported Chains** and click the **Chain Management** icon.
 4. On the **Chain Management** page, review the list of available chains. If the chains you need are not present, click **Add Chains** to include additional chains for your organization's use.
After adding a chain, all its supported tokens will be available for deposit and withdrawal in your wallets.
To view a full list of tokens and chains supported by Cobo, see [Supported tokens and chains](/en/portal/supported-tokens-and-chains).
## Set up an MPC vault
After setting up your account and organization, the next step is to configure an MPC vault. A default vault is automatically created for you. You need to complete the setup by creating a Main Key through generating key shares.
To learn about vaults, key shares, and other related concepts, see [Introduction to Organization-Controlled Wallets](/en/portal/mpc-wallets/ocw/introduction).
### Create a Main Key
A set of private key shares form a [private key](/en/portal/mpc-wallets/ocw/holder-group-overview). The Main Key is the first private key you create before using MPC Wallets.
The diagram below illustrates a Main Key with two key shares: one held by your organization, and the other generated within and stored encrypted in Cobo's multi-cloud infrastructure on your organization's behalf.
4. On the **Chain Management** page, review the list of available chains. If the chains you need are not present, click **Add Chains** to include additional chains for your organization's use.
After adding a chain, all its supported tokens will be available for deposit and withdrawal in your wallets.
To view a full list of tokens and chains supported by Cobo, see [Supported tokens and chains](/en/portal/supported-tokens-and-chains).
## Set up an MPC vault
After setting up your account and organization, the next step is to configure an MPC vault. A default vault is automatically created for you. You need to complete the setup by creating a Main Key through generating key shares.
To learn about vaults, key shares, and other related concepts, see [Introduction to Organization-Controlled Wallets](/en/portal/mpc-wallets/ocw/introduction).
### Create a Main Key
A set of private key shares form a [private key](/en/portal/mpc-wallets/ocw/holder-group-overview). The Main Key is the first private key you create before using MPC Wallets.
The diagram below illustrates a Main Key with two key shares: one held by your organization, and the other generated within and stored encrypted in Cobo's multi-cloud infrastructure on your organization's behalf.
 Follow the instructions below to create a Main Key in Cobo Portal:
1. Log in to Cobo Portal.
* For testing purposes, use the [development environment](https://portal.dev.cobo.com/login).
* For production, use the [production environment](https://portal.cobo.com/login).
2. Click **Wallets** in the left sidebar, then select **MPC Wallets**.
3. Click **Create Main Key**.
4. In the **Create Main Key** dialog box, configure **Key Share Holder 2**. For detailed information about signer types and their setup, see the [**Signer Type** table](/en/portal/mpc-wallets/ocw/holder-group-main-group).
* To use a mobile signer, select a holder from the pull-down list. The **TSS Node ID** field will be filled in automatically. Click **Confirm**. For quick testing, you can select yourself as a holder. However, for production use, refer to our [Security best practices](/en/portal/security-checklist#key-share-holder-groups) for guidance on selecting appropriate holders.
* To use a server signer, enter a holder name, fill in the TSS Node ID, and then click **Confirm**.
5. Confirm in your Portal Mobile app that you initiated this request.
### Generate key shares
To finalize the vault setup, the next crucial step is your selected signers generating their key shares. This process varies depending on your signer type:
* For mobile signers:
* Wait for the **1 key share needs to be generated** banner to appear on Portal Mobile (this may take a few seconds).
* Tap the banner to open the key generation interface.
* Follow the on-screen instructions to complete the key share generation process.
* We recommend backing up your key shares at this point for added security. However, you can also choose to complete this step later after finishing the guide.
* For server signers:
* Ensure the TSS Node server is brought online within 24 hours. The key share generation process initiates automatically when the server comes online.
* If a [TSS Node callback server](https://www.cobo.com/developers/v2/guides/mpc-wallets/server-co-signer/callback-server-overview) is configured, the generation process will only start after approval from the callback server.
Once the key generation process is completed, the status of the corresponding key share holder will become **Active** on the **Key Share Management** page on Cobo Portal. You might need to refresh the page to see the updated result.
## Create a wallet and transfer tokens
### Create a wallet
After successful key generation, a default wallet is automatically created for your vault, with addresses pre-generated for 7 [chains that are enabled by default](/en/portal/enable-or-disable-chains#chains-enabled-by-default) (Ethereum, BNB Smart Chain, Bitcoin, Arbitrum, Solana, Base, Polygon). All EVM chains share the same `0x` address, so there is no need to add them again. During the Free Trial, **Ethereum Sepolia Testnet** is also enabled and the default wallet is pre-funded with **SETH** so you can start testing right away.
You can create additional wallets by following the steps below:
1. Log in to Cobo Portal.
* For testing purposes, use the [development environment](https://portal.dev.cobo.com/login).
* For production, use the [production environment](https://portal.cobo.com/login).
2. Click **Wallets** in the left sidebar, then select **MPC Wallets**.
3. Click **Create Wallet**. In the dialog box:
* Enter a unique name for your wallet.
* If you need to automatically consolidate funds from multiple addresses, enable [auto token sweeping](/en/portal/auto-sweep-overview). If you're unsure, you can leave it disabled for now and enable it later if needed.
4. Click **Create**.
5. From the wallet list, select your newly created wallet to view its details.
### Make a deposit
To make a deposit, you should first generate a deposit address for your wallet:
1. Navigate to the **Addresses** tab, and then click **Add Address**.
2. Select a network, and then click **Create**.
3. Navigate to the address you just created and click
Follow the instructions below to create a Main Key in Cobo Portal:
1. Log in to Cobo Portal.
* For testing purposes, use the [development environment](https://portal.dev.cobo.com/login).
* For production, use the [production environment](https://portal.cobo.com/login).
2. Click **Wallets** in the left sidebar, then select **MPC Wallets**.
3. Click **Create Main Key**.
4. In the **Create Main Key** dialog box, configure **Key Share Holder 2**. For detailed information about signer types and their setup, see the [**Signer Type** table](/en/portal/mpc-wallets/ocw/holder-group-main-group).
* To use a mobile signer, select a holder from the pull-down list. The **TSS Node ID** field will be filled in automatically. Click **Confirm**. For quick testing, you can select yourself as a holder. However, for production use, refer to our [Security best practices](/en/portal/security-checklist#key-share-holder-groups) for guidance on selecting appropriate holders.
* To use a server signer, enter a holder name, fill in the TSS Node ID, and then click **Confirm**.
5. Confirm in your Portal Mobile app that you initiated this request.
### Generate key shares
To finalize the vault setup, the next crucial step is your selected signers generating their key shares. This process varies depending on your signer type:
* For mobile signers:
* Wait for the **1 key share needs to be generated** banner to appear on Portal Mobile (this may take a few seconds).
* Tap the banner to open the key generation interface.
* Follow the on-screen instructions to complete the key share generation process.
* We recommend backing up your key shares at this point for added security. However, you can also choose to complete this step later after finishing the guide.
* For server signers:
* Ensure the TSS Node server is brought online within 24 hours. The key share generation process initiates automatically when the server comes online.
* If a [TSS Node callback server](https://www.cobo.com/developers/v2/guides/mpc-wallets/server-co-signer/callback-server-overview) is configured, the generation process will only start after approval from the callback server.
Once the key generation process is completed, the status of the corresponding key share holder will become **Active** on the **Key Share Management** page on Cobo Portal. You might need to refresh the page to see the updated result.
## Create a wallet and transfer tokens
### Create a wallet
After successful key generation, a default wallet is automatically created for your vault, with addresses pre-generated for 7 [chains that are enabled by default](/en/portal/enable-or-disable-chains#chains-enabled-by-default) (Ethereum, BNB Smart Chain, Bitcoin, Arbitrum, Solana, Base, Polygon). All EVM chains share the same `0x` address, so there is no need to add them again. During the Free Trial, **Ethereum Sepolia Testnet** is also enabled and the default wallet is pre-funded with **SETH** so you can start testing right away.
You can create additional wallets by following the steps below:
1. Log in to Cobo Portal.
* For testing purposes, use the [development environment](https://portal.dev.cobo.com/login).
* For production, use the [production environment](https://portal.cobo.com/login).
2. Click **Wallets** in the left sidebar, then select **MPC Wallets**.
3. Click **Create Wallet**. In the dialog box:
* Enter a unique name for your wallet.
* If you need to automatically consolidate funds from multiple addresses, enable [auto token sweeping](/en/portal/auto-sweep-overview). If you're unsure, you can leave it disabled for now and enable it later if needed.
4. Click **Create**.
5. From the wallet list, select your newly created wallet to view its details.
### Make a deposit
To make a deposit, you should first generate a deposit address for your wallet:
1. Navigate to the **Addresses** tab, and then click **Add Address**.
2. Select a network, and then click **Create**.
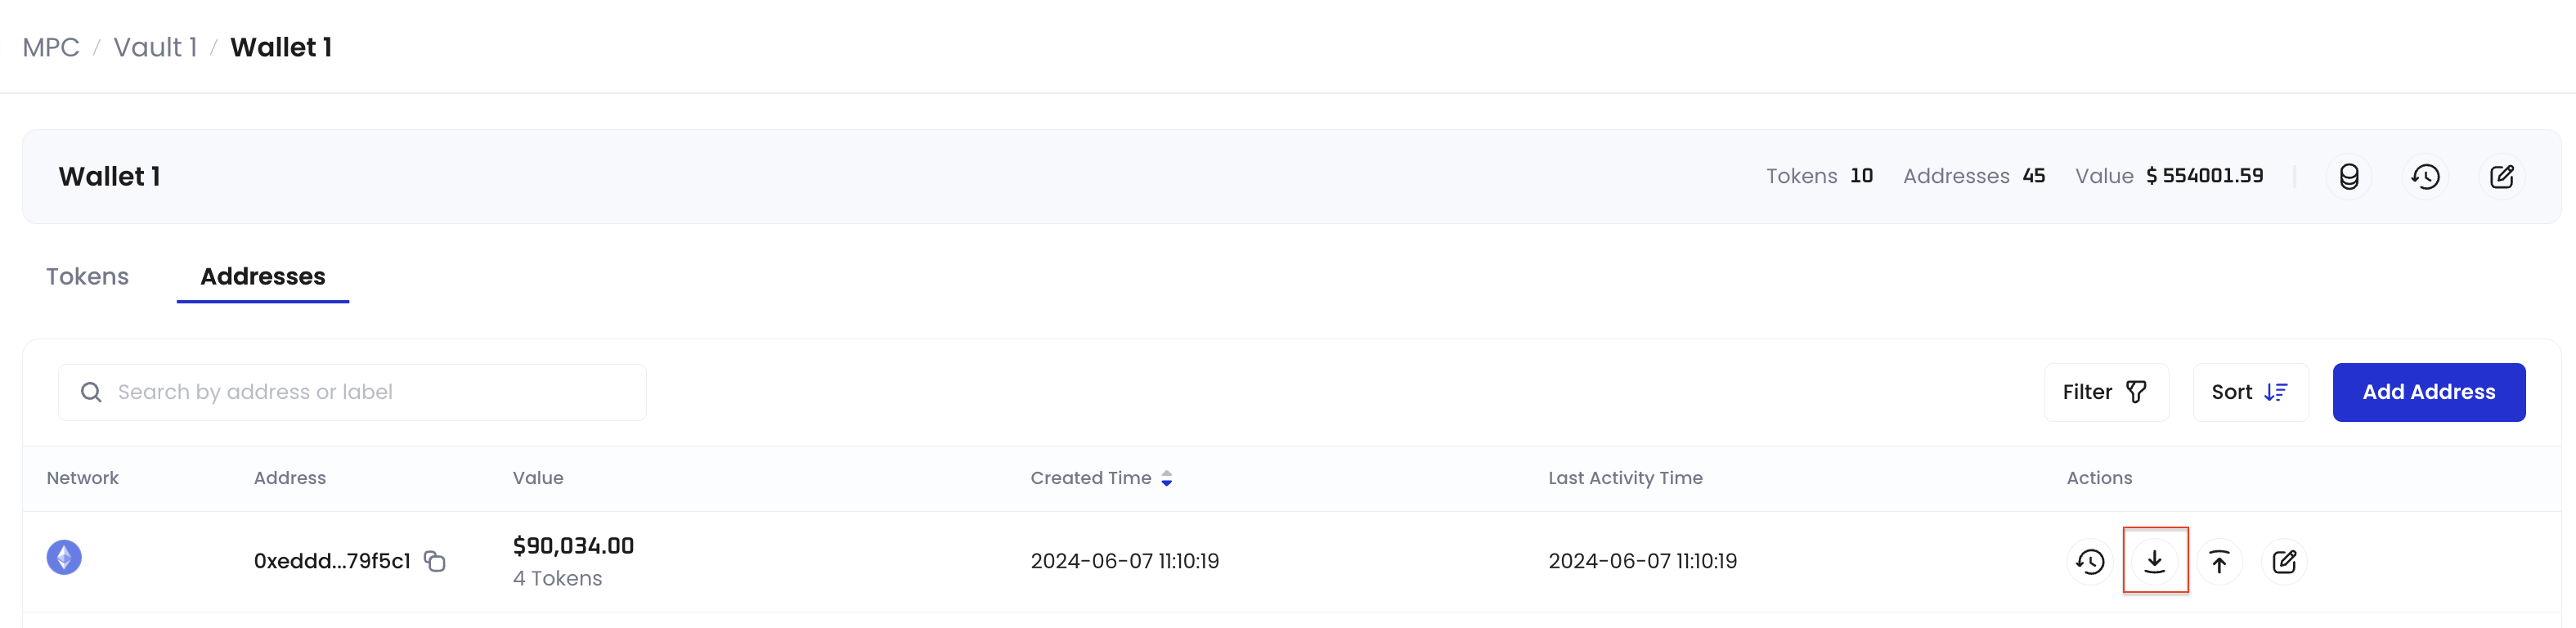
3. Navigate to the address you just created and click  to display the address.
 4. Proceed to your preferred external wallet to initiate the transfer to the deposit address.
### Configure transaction policies
If you're in the testing phase and want to quickly verify deposits and withdrawals first, you can skip this section for now and set them up later.
[Transaction policies](/en/portal/risk-controls/tx-policies-overview) are essential measures to secure your digital asset operations. When a transaction starts, it's checked against your organization's transaction policies in sequential order. If it matches a policy's trigger condition, the specified action will be taken: auto-approve, auto-reject, or an approval quorum process.
In this guide, we'll create a policy that requires 2-of-3 Admin approval for large USDT withdrawals to non-trusted addresses. For other policy setups and advanced configurations, see [Set up token transfer policy](/en/portal/risk-controls/off-chain-tx-set-transfer).
#### Prerequisites
You have at least three members with the [Admin role](/en/portal/organization/roles-and-permissions) in your organization.
#### Configure an address list
First, set up a list of trusted addresses for withdrawals:
1. Log in to Cobo Portal.
* For testing, use the [development environment](https://portal.dev.cobo.com).
* For production, use the [production environment](https://portal.cobo.com).
2. Click **Transaction Policies** in the left sidebar.
3. Navigate to the **Address Lists** tab and click **Create List**.
4. Enter a name for your address list, then click **Confirm**.
5. Click your newly created address list, click **Add Address**, then enter your trusted addresses.
6. Click **Submit** and complete MFA.
For more details on managing address lists, including batch uploads, see [Address list](/en/portal/risk-controls/address-list).
#### Create the transaction policy
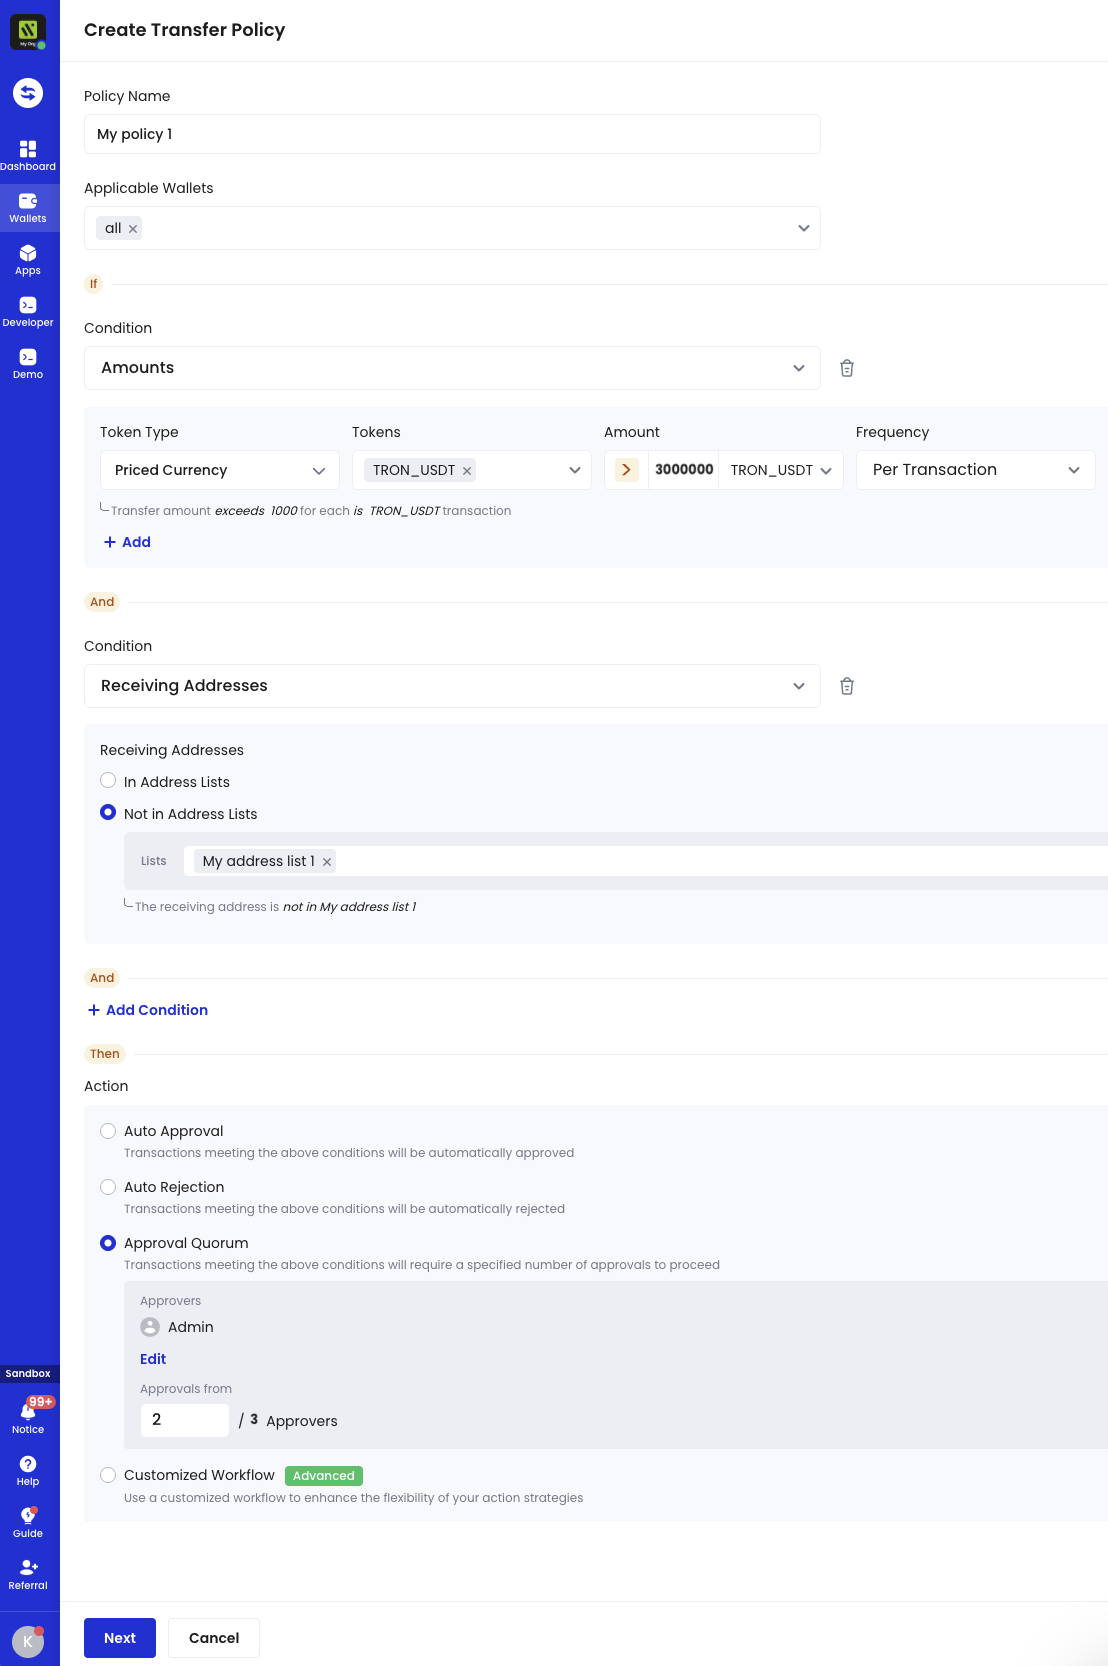
Now, let's create a policy with the following security rules:
* Trigger: Withdrawals over 30,000,000 USDT to non-trusted addresses
* Action: Require approval from 2 out of 3 approvers with the Admin user role.
Follow these steps:
1. In Cobo Portal, go to **Transaction Policies** in the left sidebar.
2. Click **Create Policy** > **Token Transfer**.
3. Configure the settings as shown in the screenshot:
4. Proceed to your preferred external wallet to initiate the transfer to the deposit address.
### Configure transaction policies
If you're in the testing phase and want to quickly verify deposits and withdrawals first, you can skip this section for now and set them up later.
[Transaction policies](/en/portal/risk-controls/tx-policies-overview) are essential measures to secure your digital asset operations. When a transaction starts, it's checked against your organization's transaction policies in sequential order. If it matches a policy's trigger condition, the specified action will be taken: auto-approve, auto-reject, or an approval quorum process.
In this guide, we'll create a policy that requires 2-of-3 Admin approval for large USDT withdrawals to non-trusted addresses. For other policy setups and advanced configurations, see [Set up token transfer policy](/en/portal/risk-controls/off-chain-tx-set-transfer).
#### Prerequisites
You have at least three members with the [Admin role](/en/portal/organization/roles-and-permissions) in your organization.
#### Configure an address list
First, set up a list of trusted addresses for withdrawals:
1. Log in to Cobo Portal.
* For testing, use the [development environment](https://portal.dev.cobo.com).
* For production, use the [production environment](https://portal.cobo.com).
2. Click **Transaction Policies** in the left sidebar.
3. Navigate to the **Address Lists** tab and click **Create List**.
4. Enter a name for your address list, then click **Confirm**.
5. Click your newly created address list, click **Add Address**, then enter your trusted addresses.
6. Click **Submit** and complete MFA.
For more details on managing address lists, including batch uploads, see [Address list](/en/portal/risk-controls/address-list).
#### Create the transaction policy
Now, let's create a policy with the following security rules:
* Trigger: Withdrawals over 30,000,000 USDT to non-trusted addresses
* Action: Require approval from 2 out of 3 approvers with the Admin user role.
Follow these steps:
1. In Cobo Portal, go to **Transaction Policies** in the left sidebar.
2. Click **Create Policy** > **Token Transfer**.
3. Configure the settings as shown in the screenshot:
 4. Click **Next** and follow the on-screen instructions to complete the policy setup.
Your policy is now active and will require 2-of-3 approval for any USDT withdrawal over 30,000,000 to non-trusted addresses.
### Make a withdrawal
Follow the steps below to withdraw tokens from your wallet.
To learn more about withdrawal, such as transaction fees, risk control measures, and signing procedures, see [Transfer from MPC Wallets (Organization-Controlled Wallets)](/en/portal/transfers/from-mpc-wallets).
1. Log in to Cobo Portal.
* For testing purposes, use the [development environment](https://portal.dev.cobo.com/login).
* For production, use the [production environment](https://portal.cobo.com/login).
2. Click **Transfer** in the left sidebar.
3. In the **Transfer** dialog box, fill in the required information, and then click **Submit**.
4. Double confirm the withdrawal on Portal Mobile.
5. After the withdrawal is confirmed, the transaction will be sent to signers. The transaction will remain pending until it receives the necessary signature.
* For **mobile signers**, notify them to open their Portal Mobile to sign the transaction.
* For **server signers**, you can check if they are online through Cobo Portal:
1. Log in to [Cobo Portal](https://portal.cobo.com/login).
2. Click **Wallets** in the left sidebar, then select **MPC Wallets**.
3. Select your vault and then click the **Manage Share Management** icon
4. Click **Next** and follow the on-screen instructions to complete the policy setup.
Your policy is now active and will require 2-of-3 approval for any USDT withdrawal over 30,000,000 to non-trusted addresses.
### Make a withdrawal
Follow the steps below to withdraw tokens from your wallet.
To learn more about withdrawal, such as transaction fees, risk control measures, and signing procedures, see [Transfer from MPC Wallets (Organization-Controlled Wallets)](/en/portal/transfers/from-mpc-wallets).
1. Log in to Cobo Portal.
* For testing purposes, use the [development environment](https://portal.dev.cobo.com/login).
* For production, use the [production environment](https://portal.cobo.com/login).
2. Click **Transfer** in the left sidebar.
3. In the **Transfer** dialog box, fill in the required information, and then click **Submit**.
4. Double confirm the withdrawal on Portal Mobile.
5. After the withdrawal is confirmed, the transaction will be sent to signers. The transaction will remain pending until it receives the necessary signature.
* For **mobile signers**, notify them to open their Portal Mobile to sign the transaction.
* For **server signers**, you can check if they are online through Cobo Portal:
1. Log in to [Cobo Portal](https://portal.cobo.com/login).
2. Click **Wallets** in the left sidebar, then select **MPC Wallets**.
3. Select your vault and then click the **Manage Share Management** icon  on the upper right hand corner.
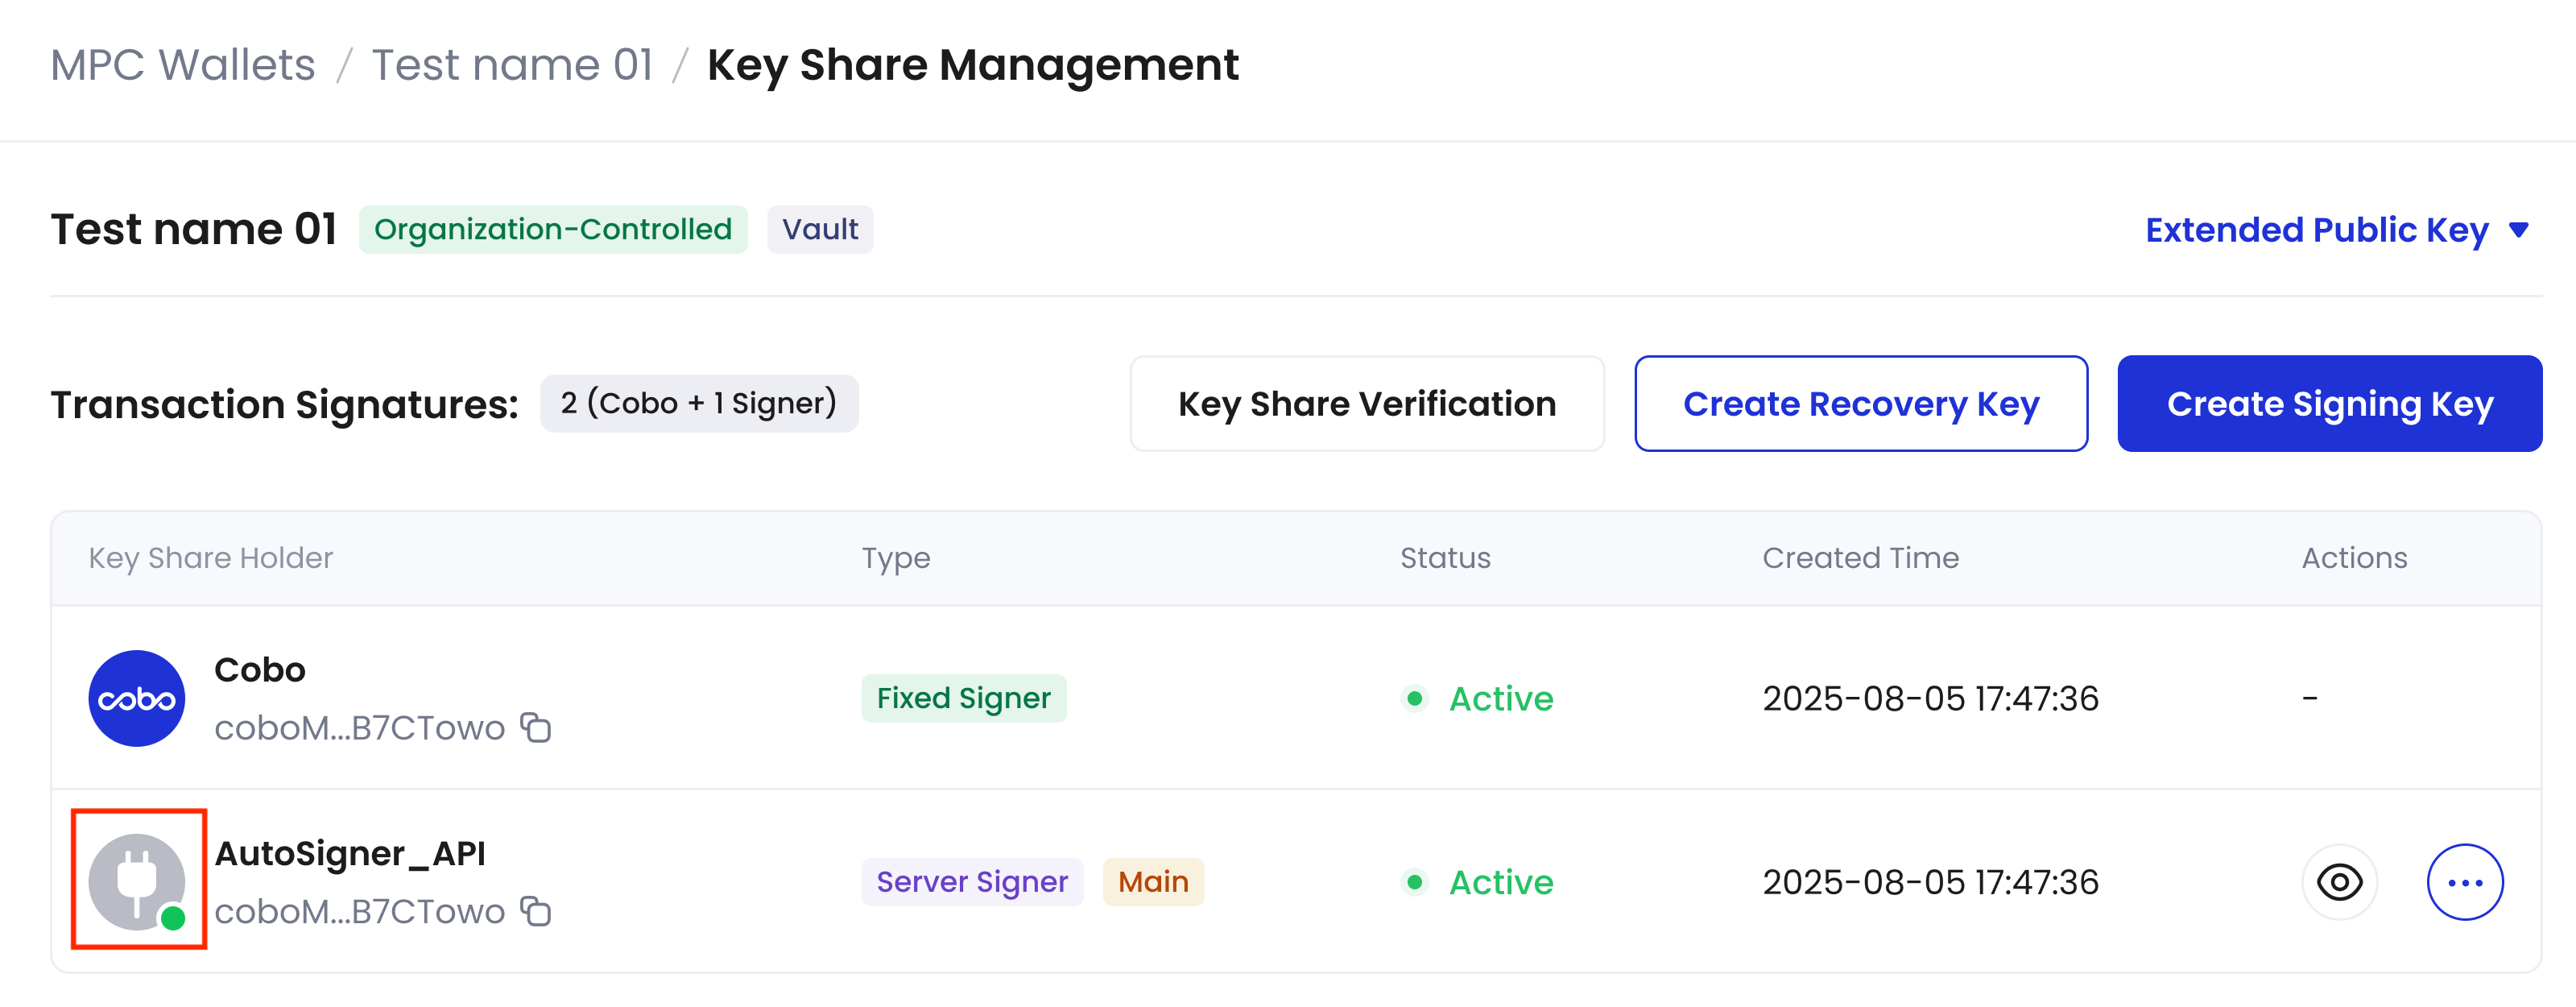
4. On the **Key Share Management** page, check if there is a green dot on the avatar of the server signer:
* 🟢 Green dot: The server is online and ready to sign transactions
* No dot: The server is offline and cannot sign transactions.
on the upper right hand corner.
4. On the **Key Share Management** page, check if there is a green dot on the avatar of the server signer:
* 🟢 Green dot: The server is online and ready to sign transactions
* No dot: The server is offline and cannot sign transactions.
 After the transaction is signed, Cobo creates and broadcasts it to the network. The token transfer may take some time to complete, depending on network conditions.
### View transaction details and status
After making a transfer to or from your Asset Wallets, you can view its transaction status in **Transaction History** in the left sidebar.
## Integrate using the WaaS API
To create wallets and transfer tokens programmatically, you can utilize our WaaS API. Follow these steps to integrate wallet functionality using the API:
1. Start with [Sending your first request](https://www.cobo.com/developers/v2/guides/get-started/get-started-with-waas). This guide covers API key registration, authentication, and SDK usage.
2. Proceed to [Integrate MPC Wallets (Organization-Controlled)](https://www.cobo.com/developers/v2/guides/mpc-wallets/get-started-ocw) for detailed instructions on creating wallets and managing token transactions.
## What's next
Congratulations on successfully setting up your MPC Wallet and completing token transfers! To further enhance your wallet's security and functionality, consider implementing these next steps:
### Implement security best practices
Follow our [security checklist](/en/portal/security-checklist) to enhance the security of your assets. For MPC Wallets specifically:
* [Back up your key shares](/en/portal/security-checklist#key-share-backup-and-recovery)
* [Create at least one Signing Key and one Recovery Key](/en/portal/security-checklist#key-share-holder-groups) in addition to the Main Key.
### Explore more features
To explore more advanced features, check out these articles:
* [Enable auto token sweeping](/en/portal/auto-sweep-overview): Automatically consolidate funds from multiple addresses into a single designated address.
* [Enable fee station](/en/portal/fee-station/introduction): Your all-in-one solution for managing bills and transaction fees.
## Learn more
* [Visit official website](https://www.cobo.com/products/wallet/mpc)
* [Read product manuals](/en/portal/mpc-wallets/introduction)
After the transaction is signed, Cobo creates and broadcasts it to the network. The token transfer may take some time to complete, depending on network conditions.
### View transaction details and status
After making a transfer to or from your Asset Wallets, you can view its transaction status in **Transaction History** in the left sidebar.
## Integrate using the WaaS API
To create wallets and transfer tokens programmatically, you can utilize our WaaS API. Follow these steps to integrate wallet functionality using the API:
1. Start with [Sending your first request](https://www.cobo.com/developers/v2/guides/get-started/get-started-with-waas). This guide covers API key registration, authentication, and SDK usage.
2. Proceed to [Integrate MPC Wallets (Organization-Controlled)](https://www.cobo.com/developers/v2/guides/mpc-wallets/get-started-ocw) for detailed instructions on creating wallets and managing token transactions.
## What's next
Congratulations on successfully setting up your MPC Wallet and completing token transfers! To further enhance your wallet's security and functionality, consider implementing these next steps:
### Implement security best practices
Follow our [security checklist](/en/portal/security-checklist) to enhance the security of your assets. For MPC Wallets specifically:
* [Back up your key shares](/en/portal/security-checklist#key-share-backup-and-recovery)
* [Create at least one Signing Key and one Recovery Key](/en/portal/security-checklist#key-share-holder-groups) in addition to the Main Key.
### Explore more features
To explore more advanced features, check out these articles:
* [Enable auto token sweeping](/en/portal/auto-sweep-overview): Automatically consolidate funds from multiple addresses into a single designated address.
* [Enable fee station](/en/portal/fee-station/introduction): Your all-in-one solution for managing bills and transaction fees.
## Learn more
* [Visit official website](https://www.cobo.com/products/wallet/mpc)
* [Read product manuals](/en/portal/mpc-wallets/introduction)