> ## Documentation Index
> Fetch the complete documentation index at: https://manuals.cobo.com/llms.txt
> Use this file to discover all available pages before exploring further.

# Manage post-screening policies

> Create custom crypto compliance rules in Screening based on risk levels, transaction directions, and amount thresholds. Automate AML/CFT policy enforcement.

Post-screening policies automatically handle transactions based on their screening results. Each policy defines when it should apply (criteria) and what action to take when it matches.

## **Post-Screening Policies** interface

<Info>
  To access this feature:

  1. Log in to [Cobo Portal](https://portal.cobo.com/login)
  2. Click **Apps** in the left sidebar to open Cobo Portal Apps
  3. Find and open **Screening**
  4. Click **Post-Screening Policies**
</Info>

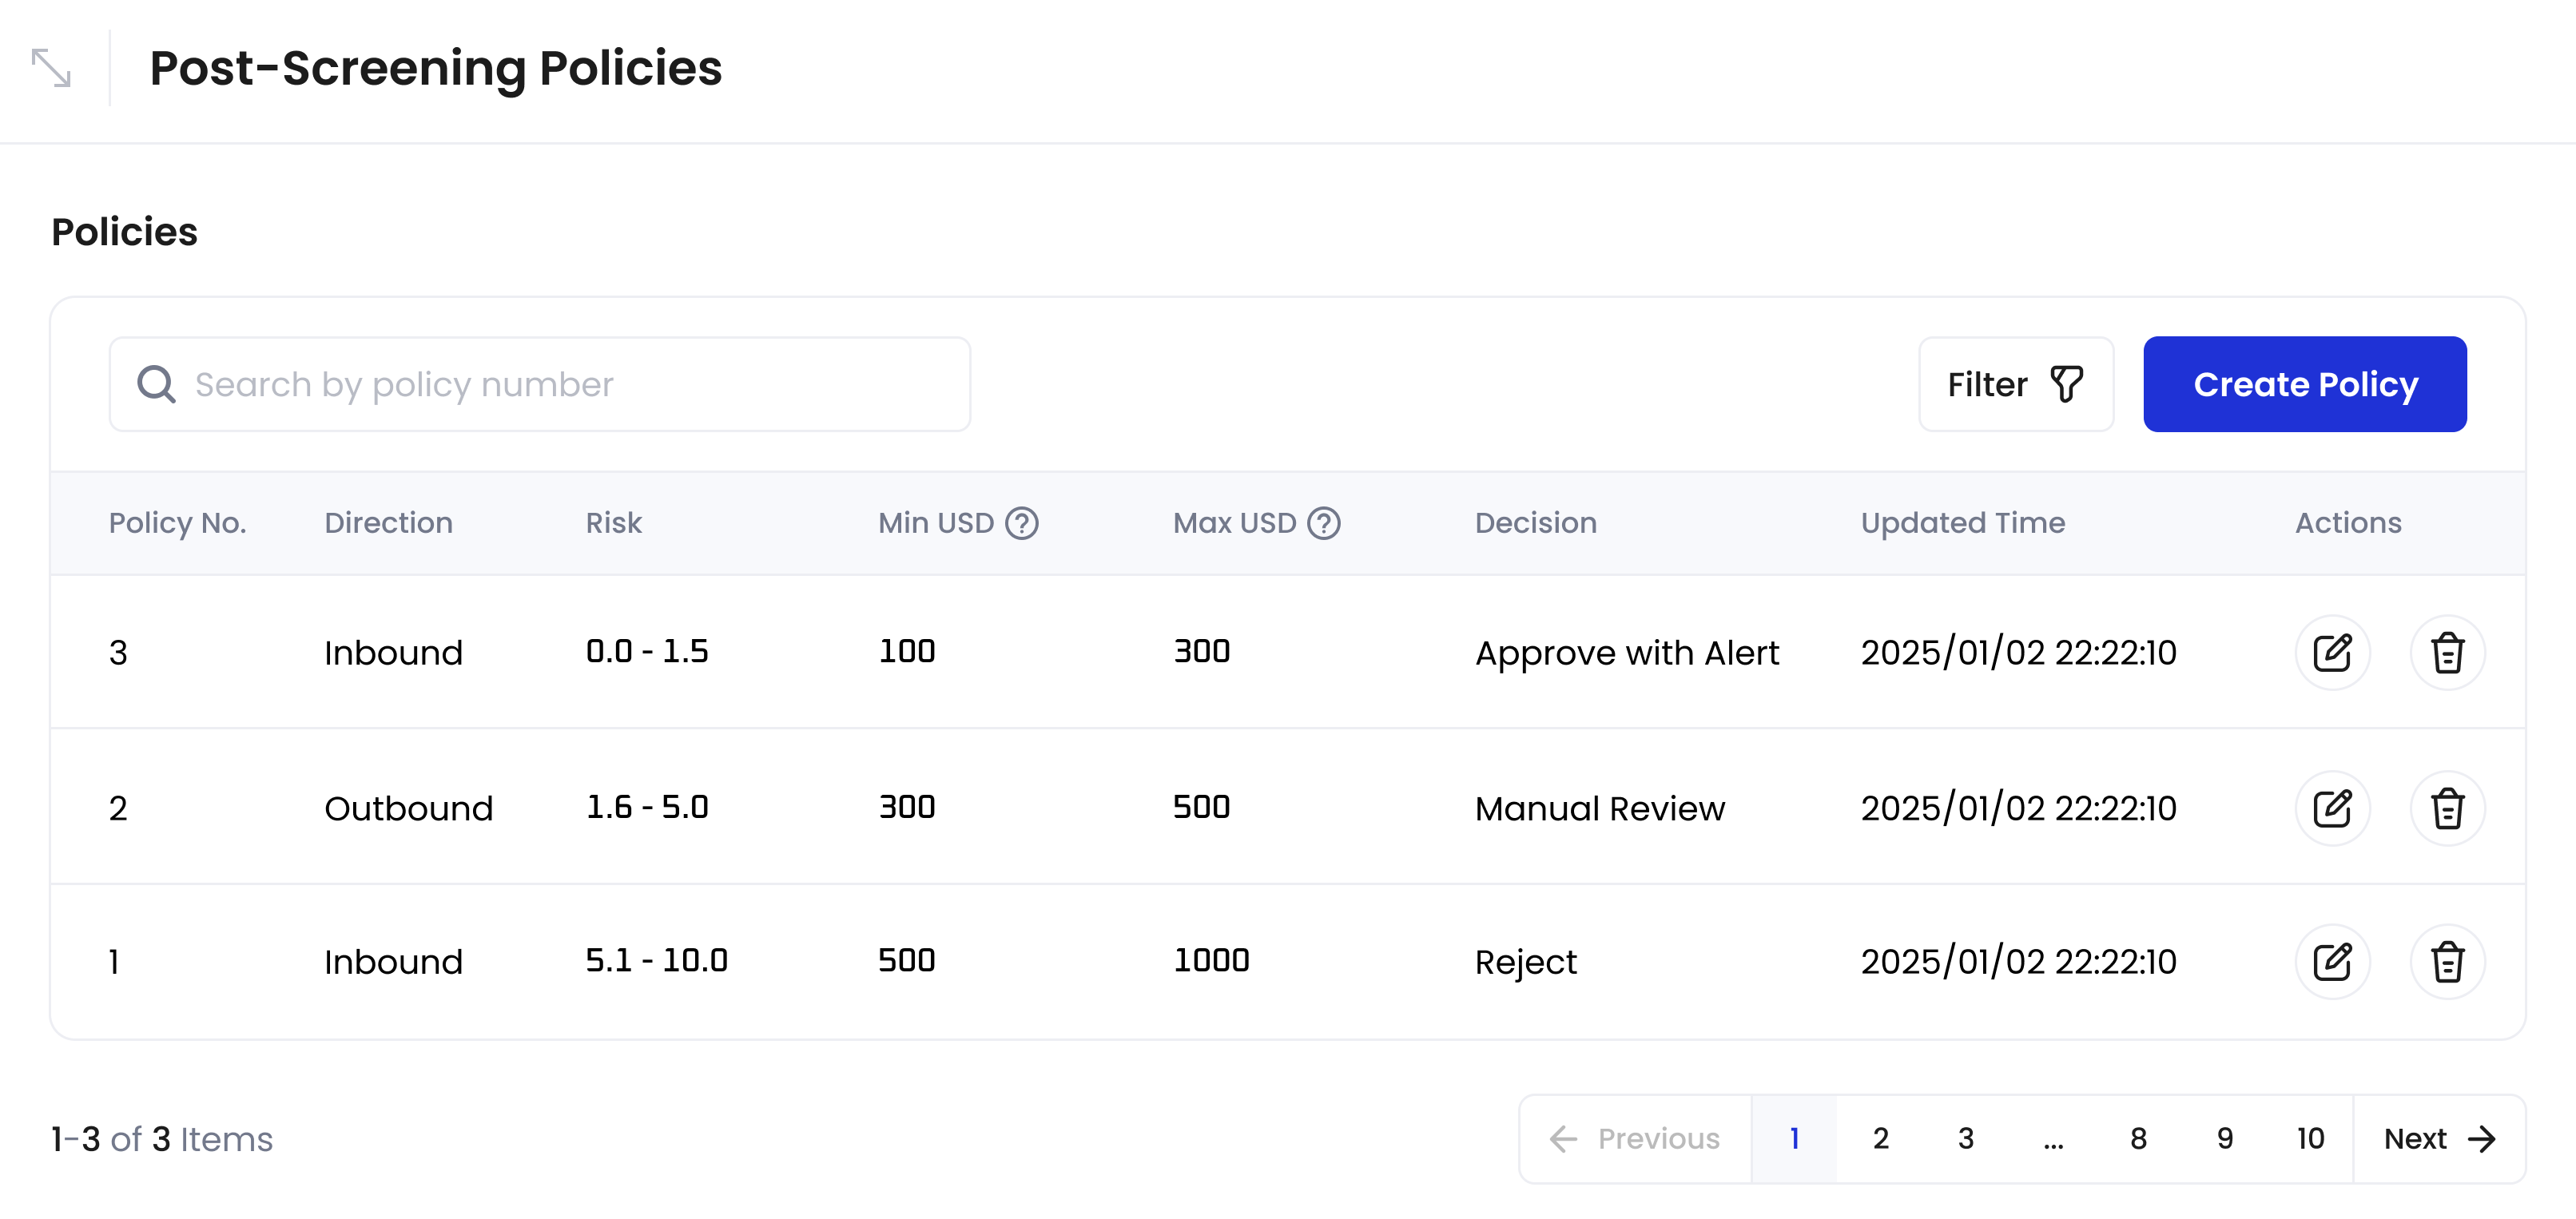
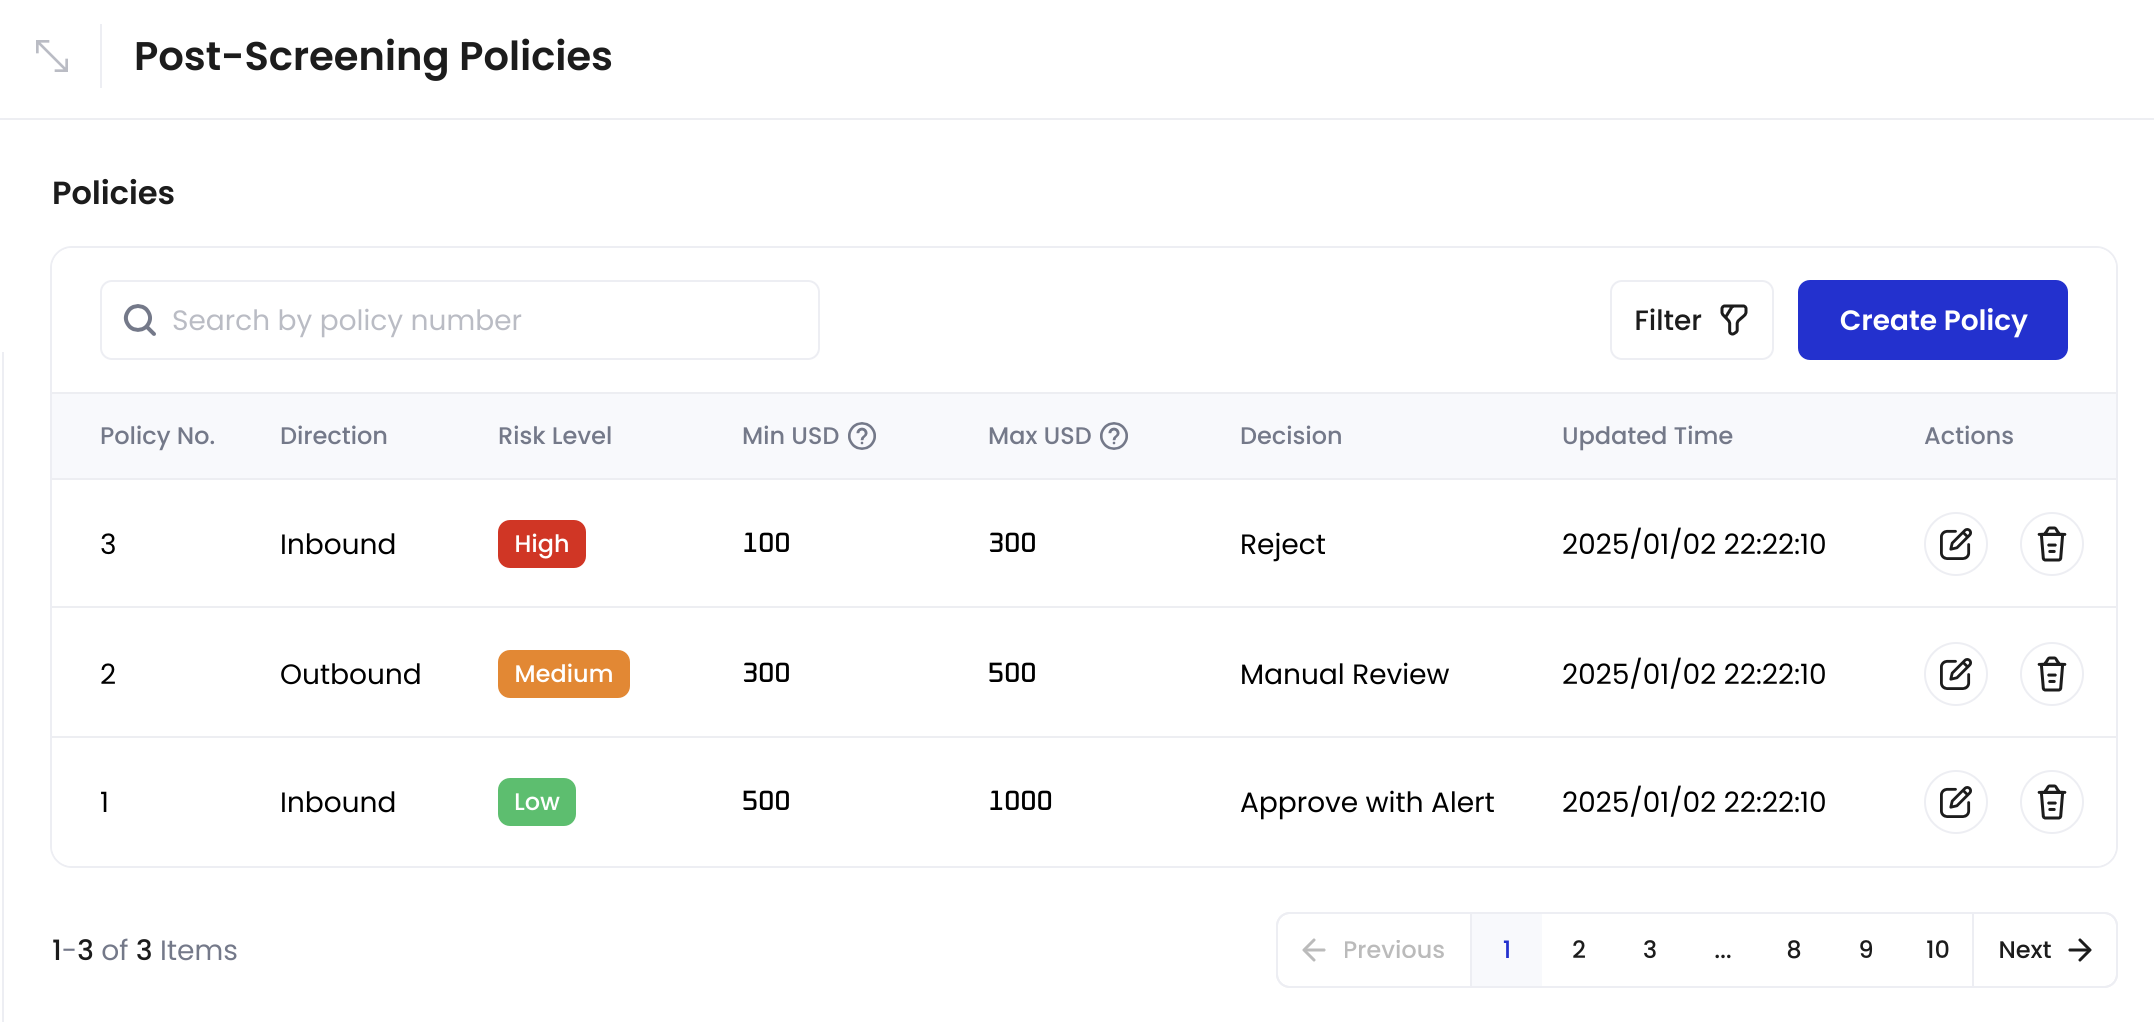
The **Post-Screening Policies** interface enables you to manage your post-screening policies.

<Tabs>
  <Tab title="CipherOwl">
    Post-Screening Policies when using CipherOwl as the AML provider:

    <img src="https://mintcdn.com/cobo-6/CNKgyV-lEAwKpwwY/en/images/portal-apps/screening/manage-post-screening-policies-cipherowl.png?fit=max&auto=format&n=CNKgyV-lEAwKpwwY&q=85&s=aed36f3e26d01a6bfc46774c0faad41b" className="screenshot_full_screen" alt="Manage Post-Screening Policies interface showing list of policies with edit and delete options" width="2154" height="1022" data-path="en/images/portal-apps/screening/manage-post-screening-policies-cipherowl.png" />

    You can filter the policies by Direction, Risk, USD Amount, Decision, AML Provider, and Updated Time.

    ## Create, edit, and delete policies
    <Note>Select and configure your preferred AML provider in [Settings](/en/apps/screening/screening-settings#aml-provider-settings) first.</Note>

    ### Create policies

    1. Go to the [Post-Screening Policies interface](#the-post-screening-policies-interface).
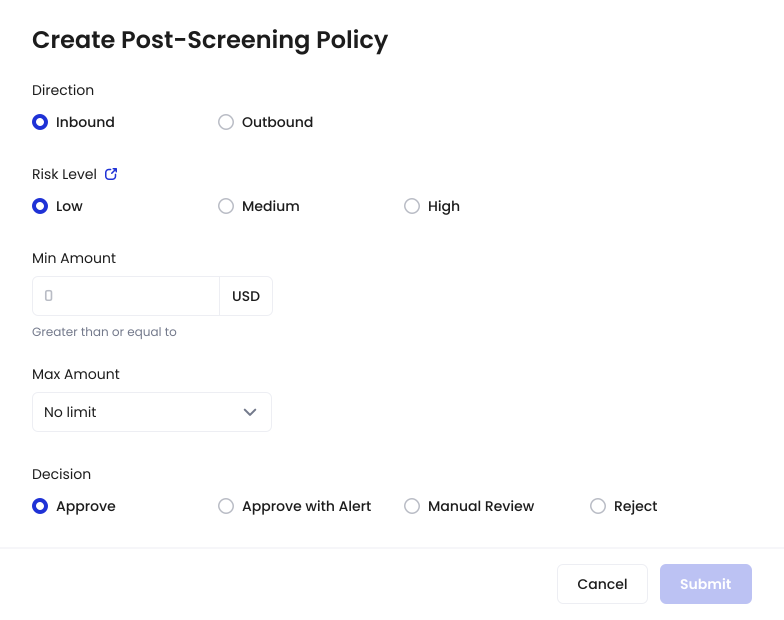
    2. Click **Create Policy**.

    * **Create Post-Screening Policy** dialog when using CipherOwl:

    <img src="https://mintcdn.com/cobo-6/kN7nJigFS3OYqEdh/en/images/portal-apps/screening/creating-post-screening-policy-cipherowl.svg?fit=max&auto=format&n=kN7nJigFS3OYqEdh&q=85&s=ef2ebf232932301debf358eb51bdedeb" className="screenshot_modal" alt="Create Post-Screening Policy dialog when using CipherOwl" width="784" height="620" data-path="en/images/portal-apps/screening/creating-post-screening-policy-cipherowl.svg" />

    3. Define policy criteria and action.

    **Policy criteria**

    <table class="table six-columns">
      <thead>
        <tr>
          <th>Policy Criteria</th>
          <th>Options</th>
          <th>Description</th>
        </tr>
      </thead>

      <tbody>
        <tr>
          <td>Direction</td>
          <td>• Inbound<br />• Outbound</td>
          <td>Transaction flow direction</td>
        </tr>

        <tr>
          <td>Risk</td>
          <td>When using CipherOwl:<br />• Low<br />• Medium<br />• High</td>
          <td>Risk classification from [CipherOwl](https://cipherowl.notion.site/Address-Risk-Score-1a0d90dd030f80b5904cd4aa76e15cea)</td>
        </tr>

        <tr>
          <td>Amount Range</td>
          <td>• Min Amount<br />• Max Amount</td>
          <td>Transaction value range (in USD)</td>
        </tr>
      </tbody>
    </table>

    **Policy actions**

    <table class="table six-columns">
      <thead>
        <tr>
          <th>Decision</th>
          <th>Effect on transaction</th>
        </tr>
      </thead>

      <tbody>
        <tr>
          <td>Approve</td>
          <td>• Inbound: Release funds<br />• Outbound: Allow to proceed</td>
        </tr>

        <tr>
          <td>Approve with Alert</td>
          <td>• Inbound: Release funds + notification<br />• Outbound: Allow + notification</td>
        </tr>

        <tr>
          <td>Reject</td>
          <td>• Inbound:<br />  • Flag transactions and freeze funds <br />    • Note: If you are using the [auto token sweeping feature of MPC Wallets](/en/portal/auto-sweep-overview), frozen funds will not be included in the sweep operation.<br />• Outbound: Block transaction<br />• Risk notification is always sent</td>
        </tr>

        <tr>
          <td>Manual Review</td>
          <td>• Inbound: Wait for manual review<br />• Outbound: Wait for manual review<br />Note: Manual review is manual assessment to determine whether to approve or reject it. It's suitable for clients with sufficient compliance resources or those requiring more granular risk classification, allowing an additional review of transactions with unclear risk levels. The review result can be submitted via the WaaS API or through the Screening app interface.</td>
        </tr>
      </tbody>
    </table>

    4. Click **Submit** to enable the policy.

    <Note>
      When Screening has the scan results:

      * Due to [overlap prevention rules](#overlap-prevention-rules), at most one policy will match any given transaction
      * A policy matches when the transaction's direction, risk level, and amount range match the policy's criteria
      * When a match is found, Screening executes that policy's action
    </Note>

    <Warning>If no policy matches, the transaction is automatically approved. To ensure proper risk management, make sure to set up appropriate policies that cover all your transaction scenarios before using Screening.</Warning>

    #### Overlap prevention rules

    The system prevents creation of overlapping policies. A policy cannot be created if it has all of the following in common with an existing active policy:

    * Same direction (Inbound/Outbound)
    * Same risk level
    * Overlapping amount range

    For example:

    ```
    Policy 1: Inbound + Medium risk + ≥ 500 + < 1000 USD (Valid)
    Policy 2: Inbound + Medium risk + ≥ 400 + < 7000 USD (Invalid - amount range overlaps with Policy 1)
    Policy 2: Inbound + Medium risk + ≥ 600 + < 700 USD (Invalid - amount range overlaps with Policy 1)
    Policy 2: Inbound + Medium risk + ≥ 1000 + < 7000 USD (Valid - amount range does not overlap)
    Policy 3: Outbound + Medium risk + ≥ 1000 + < 7000 USD (Valid - different direction)
    ```

    <Warning>
      The policy examples above are for illustration purposes only. Your actual policies should be tailored to your organization's specific compliance requirements and risk management strategy.

      For CipherOwl, refer to CipherOwl's [Address Risk Score](https://cipherowl.notion.site/Address-Risk-Score-1a0d90dd030f80b5904cd4aa76e15cea) documentation or consult with their compliance experts via [CipherOwl](https://www.cipherowl.com/)'s website.
    </Warning>
  </Tab>

  <Tab title="Elliptic">
    Post-Screening Policies when using Elliptic as the AML provider:

    <img src="https://mintcdn.com/cobo-6/CNKgyV-lEAwKpwwY/en/images/portal-apps/screening/manage-post-screening-policies-elliptic.png?fit=max&auto=format&n=CNKgyV-lEAwKpwwY&q=85&s=7afbabba5ff4853434fd8eaee7670845" className="screenshot_full_screen" alt="Manage Post-Screening Policies interface showing list of policies with edit and delete options" width="3224" height="1526" data-path="en/images/portal-apps/screening/manage-post-screening-policies-elliptic.png" />

    You can filter the policies by Direction, Risk, USD Amount, Decision, AML Provider, and Updated Time.

    ## Create, edit, and delete policies
    <Note>Select and configure your preferred AML provider in [Settings](/en/apps/screening/screening-settings#aml-provider-settings) first.</Note>

    ### Create policies

    1. Go to the [Post-Screening Policies interface](#the-post-screening-policies-interface).
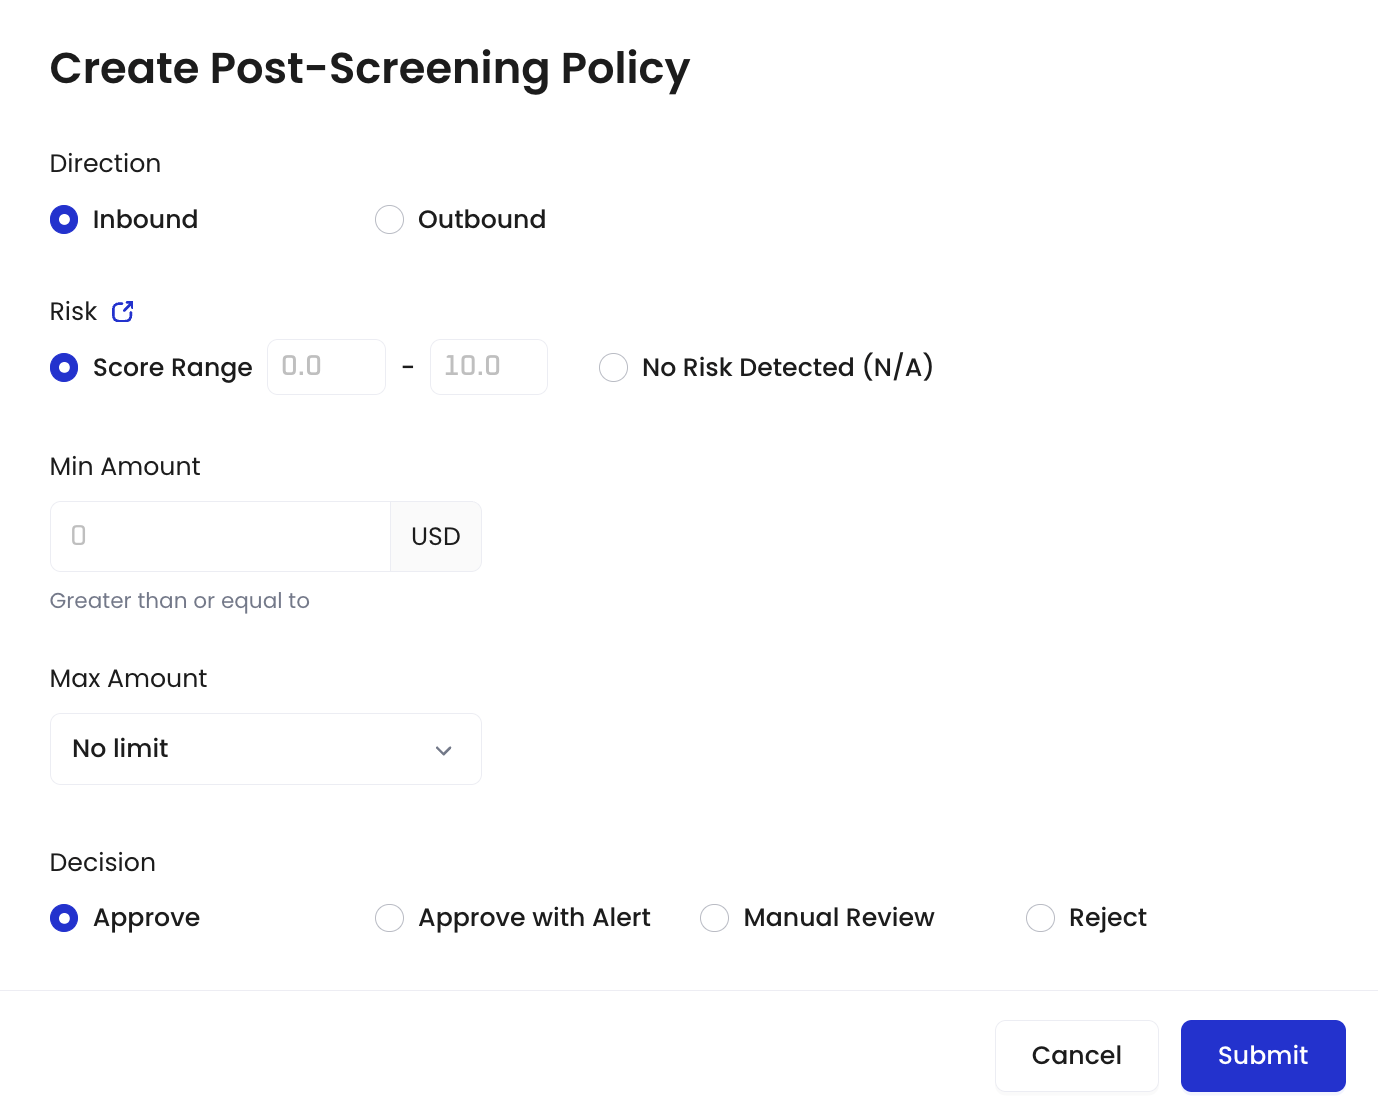
    2. Click **Create Policy**.

    <img src="https://mintcdn.com/cobo-6/-Ngm6BReDDPFPwZT/en/images/portal-apps/screening/creating-post-screening-policy-elliptic.png?fit=max&auto=format&n=-Ngm6BReDDPFPwZT&q=85&s=d00708aa52f37a71c11cef2a67edd2b2" className="screenshot_modal" alt="Create Post-Screening Policy dialog when using Elliptic" width="1378" height="1115" data-path="en/images/portal-apps/screening/creating-post-screening-policy-elliptic.png" />

    3. Define policy criteria and action.

    **Policy criteria**

    <table class="table six-columns">
      <thead>
        <tr>
          <th>Policy Criteria</th>
          <th>Options</th>
          <th>Description</th>
        </tr>
      </thead>

      <tbody>
        <tr>
          <td>Direction</td>
          <td>• Inbound<br />• Outbound</td>
          <td>Transaction flow direction</td>
        </tr>

        <tr>
          <td>Risk</td>
          <td>When using Elliptic:<br />• NA<br />• Numerical score from 0.0 to 10.0 (in 0.1 increments)</td>
          <td>Numerical risk score with higher values indicating higher risk (see [Elliptic's Risk Score documentation](https://help.elliptic.co/en/articles/2641454-interpreting-risk-scores))</td>
        </tr>

        <tr>
          <td>Amount Range</td>
          <td>• Min Amount<br />• Max Amount</td>
          <td>Transaction value range (in USD)</td>
        </tr>
      </tbody>
    </table>

    **Policy actions**

    <table class="table six-columns">
      <thead>
        <tr>
          <th>Decision</th>
          <th>Effect on transaction</th>
        </tr>
      </thead>

      <tbody>
        <tr>
          <td>Approve</td>
          <td>• Inbound: Release funds<br />• Outbound: Allow to proceed</td>
        </tr>

        <tr>
          <td>Approve with Alert</td>
          <td>• Inbound: Release funds + notification<br />• Outbound: Allow + notification</td>
        </tr>

        <tr>
          <td>Reject</td>
          <td>• Inbound:<br />  • Flag transactions and freeze funds <br />    • Note: If you are using the [auto token sweeping feature of MPC Wallets](/en/portal/auto-sweep-overview), frozen funds will not be included in the sweep operation.<br />• Outbound: Block transaction<br />• Risk notification is always sent</td>
        </tr>

        <tr>
          <td>Manual Review</td>
          <td>• Inbound: Wait for manual review<br />• Outbound: Wait for manual review<br />Note: Manual review is manual assessment to determine whether to approve or reject it. It's suitable for clients with sufficient compliance resources or those requiring more granular risk classification, allowing an additional review of transactions with unclear risk levels. The review result can be submitted via the WaaS API or through the Screening app interface.</td>
        </tr>
      </tbody>
    </table>

    4. Click **Submit** to enable the policy.

    <Note>
      When Screening has the scan results:

      * Due to [overlap prevention rules](#overlap-prevention-rules), at most one policy will match any given transaction
      * A policy matches when the transaction's direction, risk score, and amount range match the policy's criteria
      * When a match is found, Screening executes that policy's action
    </Note>

    <Warning>If no policy matches, the transaction is automatically approved. To ensure proper risk management, make sure to set up appropriate policies that cover all your transaction scenarios before using Screening.</Warning>

    #### Overlap prevention rules

    The system prevents creation of overlapping policies. A policy cannot be created if it has all of the following in common with an existing active policy:

    * Same direction (Inbound/Outbound)
    * Same risk score range
    * Overlapping amount range

    For example:

    ```
    Policy 1: Inbound + Medium risk + ≥ 500 + < 1000 USD (Valid)
    Policy 2: Inbound + Medium risk + ≥ 400 + < 7000 USD (Invalid - amount range overlaps with Policy 1)
    Policy 2: Inbound + Medium risk + ≥ 600 + < 700 USD (Invalid - amount range overlaps with Policy 1)
    Policy 2: Inbound + Medium risk + ≥ 1000 + < 7000 USD (Valid - amount range does not overlap)
    Policy 3: Outbound + Medium risk + ≥ 1000 + < 7000 USD (Valid - different direction)
    ```

    <Warning>
      The policy examples above are for illustration purposes only. Your actual policies should be tailored to your organization's specific compliance requirements and risk management strategy.

      For Elliptic, refer to their [Interpreting Risk Scores](https://help.elliptic.co/en/articles/2641454-interpreting-risk-scores) and [Configuring Your Risk Rules](https://help.elliptic.co/en/articles/8216353-configuring-your-risk-rules) documentation.
    </Warning>
  </Tab>
</Tabs>

### Edit policies

1. Go to the [Post-Screening Policies interface](#the-post-screening-policies-interface).
2. Click <img src="https://mintcdn.com/cobo-6/iUEIXAPu2nP-33wJ/en/images/common/icon_edit.svg?fit=max&auto=format&n=iUEIXAPu2nP-33wJ&q=85&s=7a29d417f8ab29d73a33b4f5adfd8571" className="icon" alt="edit icon" width="34" height="34" data-path="en/images/common/icon_edit.svg" /> next to the policy you want to edit.
3. On the **Edit Post-Screening Policy** dialog, make the necessary changes to the policy criteria and action (see [Policy criteria](#policy-criteria) and [Policy actions](#policy-actions)).
4. Click **Submit**.

<Info>The same [overlap prevention rules](#overlap-prevention-rules) apply when editing policies.</Info>

### Delete policies

1. Go to the [Post-Screening Policies interface](#the-post-screening-policies-interface).
2. Click <img src="https://mintcdn.com/cobo-6/iUEIXAPu2nP-33wJ/en/images/common/icon_delete.svg?fit=max&auto=format&n=iUEIXAPu2nP-33wJ&q=85&s=d3f56af2211d0a566cc268fff5f57e57" className="icon" alt="delete icon" width="34" height="34" data-path="en/images/common/icon_delete.svg" /> next to the policy you want to delete.
3. On the **Delete Policy** dialog, click **Yes** to confirm deletion.